Skip to content

Mind in the gutter(s)

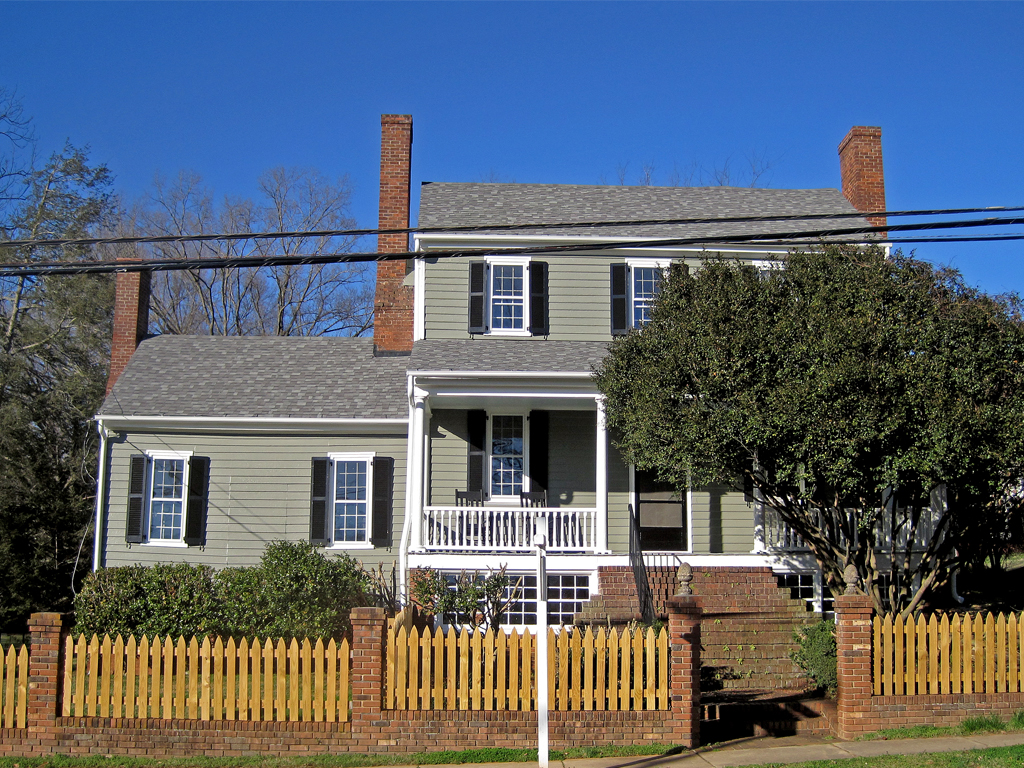
When it came time to paint, we piled on the financial pain by electing to replace gutters at the same time. It would have been nearly impossible to get a good coat of paint on the eaves of the roof if they’d been left in place. And since we anted up for an A+ paint job, skimping on one of the most vulnerable portions of the house would have been foolish.

The original gutters were galvanized steel half-rounds that had been painted white. The paint was peeling and the metal was beginning to rust through badly enough that one of the downspouts at the front of the house shot a geyser of water horizontally onto the front porch every time it rained. I don’t believe in steel gutters. They’re strong, but their zinc coating eventually breaks down in the continual presence of water. Leaky or badly installed gutters are worse than no gutters at all. They concentrate the flow of hundreds of gallons of water in a heavy rain – delivered to the wrong place, this amount of water can cause a lot of damage very quickly.

Just before the painters arrived, I had the gutter guys come pull down the old half-rounds.  They ended up in a pile on the front lawn where their deteriorated state was even more obvious.

gutter pile

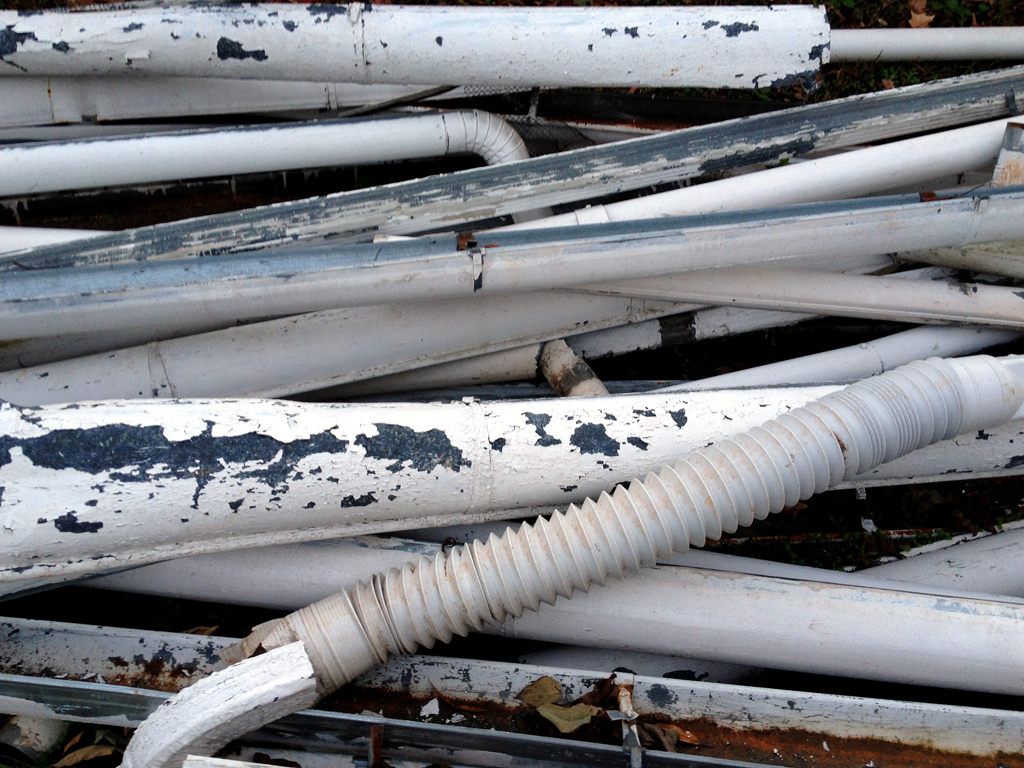
Aside from allowing the painters to apply a good layer of paint to the roof eaves, removing the gutters exposed several areas of rotted wood and a couple of squirrel entry points to the attic. Some lengths of the 1750s crown molding had succumbed to 250 years of continual exposure to the weather. We had replacement trim custom milled using sections of the old profiles as a template.

With the painters hard at work outside, I was inside wracking my brain to devise an attachment method for our new gutters. Because the eaves of the roof have deep crown moldings, installing gutters wasn’t straightforward like it is when there’s a flat fascia to screw into. The old ones were attached with metal strap hangers that were nailed directly to the roof sheathing below the shingles. The only good time to replace strap hangers is when you’re replacing a roof and all the shingles have been torn off. Our roof was replaced a little over a year ago, so I didn’t want to mess with it. One contractor I interviewed had no shame and suggested tearing off the crown and replacing it with a 2×4 since “nobody’d ever know”. Needless to say, that gentleman didn’t get the job. Another suggested using these strange looking hangers:

#6 shank

The tabs at the back of these hangers bend to hold the hanger vertically against the trim.  But using these hangers presumes that you have solid wood backing behind the crown. The trim on our house is nailed in place with nothing behind it, so screwing hangers to it would have risked damaging the wood and would have resulted in a flimsy connection.

With no attachment solution after several weeks of head-scratching, I stumbled across a product sold by Classic Gutters Systems in Kalamazoo, Michigan.  They sell a stainless steel rod hanger that turned out to be a perfect fit for our circumstances. The rods are a stout 3/16″ thick and are crafted of stainless steel, so they’ll never rust. One end of the rod is threaded for attaching a concealed gutter bracket with a couple of stainless steel nuts. The other end is flattened and has two holes for screwing the rod to the roof.

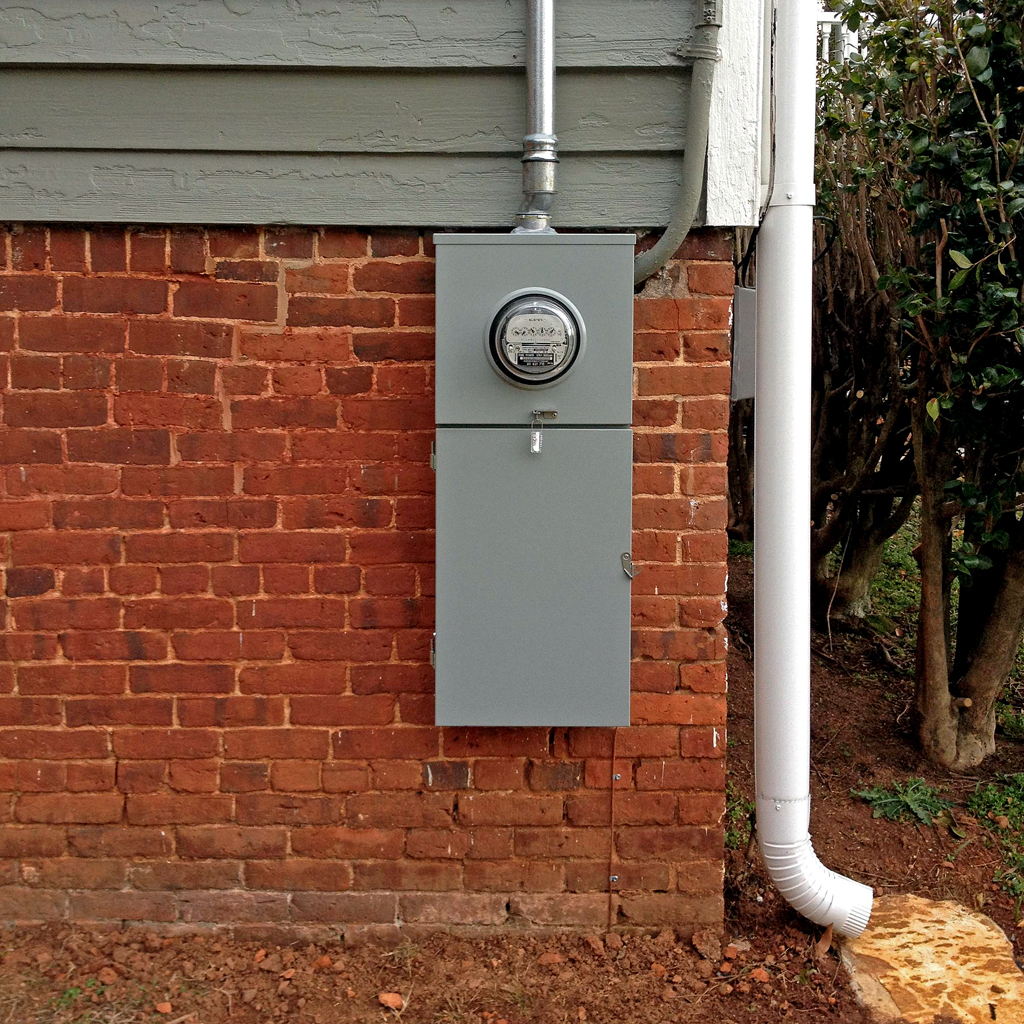
Using a special bending tool that I rented from Classic Gutters, the contractor bent each hanger to the pitch of the roof, tucked the flattened end of the rod under the second row of shingles and attached it with a pair of stainless steel pan-head screws with a very low head profile. Since the penetrations are hidden under the shingles, they won’t leak. The rods hold the gutters far enough forward from the roof that they don’t get in the way of the crown molding. Spaced at two foot intervals, the hangers are visible where they extend across the first row of shingles. But since the house is so tall, you have to stand far away to see the them, and I don’t mind them even where they’re visible. Surprisingly, the rods cost less than standard half-round hangers.

gutter rod

Attached to the ends of the rods are aluminum brackets that nest inside the gutter, supported by a pair of nuts. Adjusting the level of the nuts up or down allows the installer to pitch the gutters toward the downspouts.

The gutters are 6″ white aluminum half-rounds with 4″ round downspouts. They’re big enough to channel water away quickly and are less susceptible to clogging than smaller profiles. The aluminum won’t rust through and the support rods are extremely strong, so I expect the installation to last at least the lifetime of the roof.

finished gutters

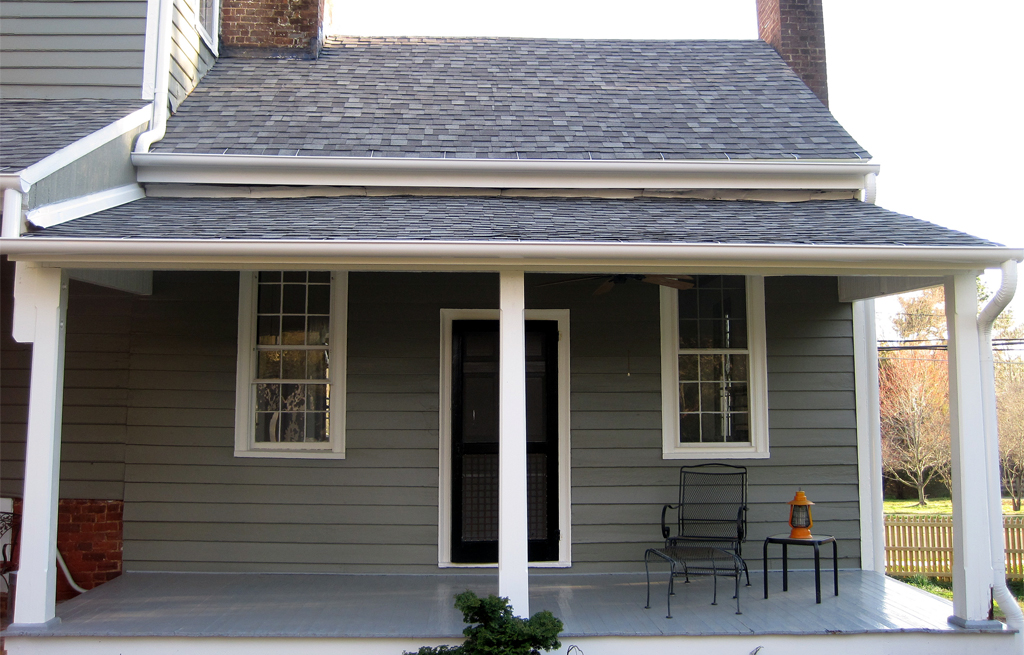
Replacing the gutters was the right thing to do. The old ones would have looked positively awful against the fresh paint job, and the new ones will prolong the longevity of the paint. Our gutter man was a good sport about the installation, even though the hangers were a bit tedious. It took a few days longer than he anticipated, but we both feel good about the end result.

Before tour: the west bedroom

The west bedroom is the fraternal twin of the east bedroom across the hall and it’s one of my favorite rooms in the house. With northern, southern and western exposures, it’s bathed in light for all but the early morning hours. We’re reserving it for the good kid. (Somewhere, my mom’s heart rate jumped a notch at the mention of this hypothetical kid. “No pressure” she assures me.)

west bedroom light

The west windows frame views across the roof of the library and down King Street to the tower of the courthouse, making the room feel very connected to the heart of Hillsborough. Like the east bedroom, there’s a fireplace, this one with a mini-me version of the living room mantel. The experienced eye of a brick mason who toured the house this summer identified the brick hearth as the only untouched original in the house, as evidenced by the spiral pattern of the masonry.

The closets are slightly less offensive than the large one in the east bedroom, but I’ve got some ideas about how they might be improved.

west bedroom closets

The original plank ceilings have been concealed with humdrum wood paneling that I’d like to eventually remove. As with most of the walls in the house, the plaster is failing and is tenuously held in place by a layer of vinyl wallpaper that’s been painted over (curses to all those who commit this unforgivable crime). The floors are delightfully lumpy, creaky and imperfect.

As with the east bedroom, our interventions here will be relatively minor, aimed mostly at updating and freshening the finishes. Until then, I’ll continue to occasionally step in to survey our domain from on high, and appreciate the views of our neat little town.

They’re baaack…

File this one under: if it’s too good to be true….

When we moved into the house, a small family of squirrels was using our attic as an expansive rodent residence. A bit of wood repair during our paint job blocked their entry routes, and I’ve surveyed the eaves periodically since then to be certain that they don’t return. And I thought they hadn’t. At least until I returned home one evening and observed a bushy tail flicking out the top of a chimney. Seems that at least one of the furry beasties didn’t move far, overlooking the plethora of enormous trees in our yard in favor of a carcinogen-caked brick flue.

As evidence, I submit exhibit A:

squirrel chart

  1. Squirrel, calmly observing my fit of rage.
  2. Brick missing from chimney.
  3. Missing brick (see #2) now on ground due to squirrel (see #1) hopping in and out of chimney.
  4. A/C units!

Now, I’m something of a control freak when it comes to my house and this sort of uninvited guest draws forth an unbridled fury in me that’s completely out of proportion to the magnitude of the problem. To some degree, I lost my ability to think rationally when I discovered the varmint’s presence. But in a moment of lucidity, I realized that the only clear path to the high roof was by way of some low-hanging branches on an adjacent tree.  So I bought a pole saw and whacked them posthaste. Satisfied with my efforts, that evening I watched as the frustrated squirrel looked around confused at the change in his daily commute, pausing briefly before leaping 15+ feet across the gap as easily as I might jump a puddle in the sidewalk, and then springing into the chimney. Boy, did that get my knickers in a twist.

The very next morning, I headed off to the hardware store to pick up a steel trap. Everything you read on the internet makes it sound like trapping squirrels is akin to shooting fish in a barrel.  Set the trip plate, throw down a couple peanuts and you’ll have six or eight of the little buggers in a couple of hours. Well, the squirrels in this town must have PhDs (just like all the people), because after two weeks I haven’t caught a single one.  I’ve caught two birds and put out enough peanut butter, corn, sunflower seed and cereal to feed a horse for a month. But not a single squirrel.  The bait disappears and the trap trips, but no squirrels. I don’t intend to hurt the critter, I just want him to make his home elsewhere.

So, I’m feeling a bit desperate and trying to strategize my next move. The chimneys need to be capped.  It’s a minor miracle that they’re in such good shape after being open to 250 years of rain and snow. This is a project that was already high on my list, but I worry that if I take away the squirrel’s home without relocating him first, he might go looking for another one nearby – e.g., in the attic, by way of our newly painted trim. I wonder if I should have the tree man come chop the branches that he leaps from first.  This would have the additional advantage of discouraging newcomers. Or do I call the professional wildlife people to try to trap him? Has anybody had success ridding themselves of these persistent critters, and if so, how?

I’m accepting all advice and until then, if you see me throwing rocks in trees, I haven’t lost my mind, I’m just trying to convince Chip to move into the nearest available hardwood hovel.

Before tour: the east bedroom

The Ordinary House has three bedrooms, all upstairs.  Two of them are in the original, 1750s portion of the house.  Since the house was a tavern at one time, I presume that these rooms once served as guest quarters for overnight patrons.  If only those walls could talk…

Both of the small bedrooms are long and skinny by present-day standards at about 9′-6″ wide and over 19′ long. It’s not a room proportion I’d ever draw for a client, but it’s actually quite cozy, in a good way:

east bed to hall

The room has original heart pine floors and ceiling boards.  The walls have been covered with some cheap-o paneling that I’ll pull down sooner or later.  The door appears to be original and has a nice cast iron rim latch with porcelain knobs.  There are three double-hung windows with nine-over-six sashes and wavy glass panes.  As you’d expect, the east bedroom gets great light in the morning.

Our master suite is large and has lots of potential, but I admit to being jealous of the fireplace that shows up in each of the smaller bedrooms:

east bed fireplace

Note the radiator piping that continues across the firebox opening, camouflaged with a bit of trim paint where it runs in front of the mantel.  Maybe the boiler installer thought this would be a convenient way to boost the output of the radiators on particularly cold mornings? The mantel in the east bedroom is very different than the ones in the rest of the house, so I suspect that it may have migrated here from another home during a past renovation.

At some point, a closet was added to the end of the room.

east bed closet

The choice of sliding doors is unfortunate, and will be remedied by the business end of my sledgehammer. The bedroom renovations will be fairly low impact and will mostly be about freshening up finishes. For now, we use the east bedroom as our guest room. Someday, it’ll be nice for a rugrat.  And until then, we’ll fill the void with gratuitous cute puppy photos.

For example, Louis enjoys our new central heat (there’s a register right behind him):

louis likes heat

Pretty ordinary #006: Heated edition

Cue excitement.

If you’re not sure what’s pretty or exciting about this photo, welcome to the blog.

thermostat

After a week-and-a-half of heavy-handed intervention, William Reed’s Ordinary has officially joined the 21st century with modern, efficient heating and cooling systems. There are a few odds and ends for the HVAC contractor to finish up, and a county inspection to pass, but warm air is flowing from the floor vents as I write this. Stay tuned for a detailed recounting of how we integrated central air into a house that was built more than 150 years before it became commonplace…

Stairway to heaven-ly heat

Two major obstacles stood in the way of installing central heat and air in our house. The first, inadequate electrical service, was taken care of recently when we upgraded to 200 amps of power. A less costly, but no less vexing issue was the fact that our attic was only accessible from the top rung of a step ladder through a minuscule 18″ wide scuttle hole. Barely adequate for this scrawny dude to shimmy above the ceiling, it certainly wasn’t large enough for a furnace and full-size sheets of plywood to make it up there.

scuttle hole

(In case you’re starting to question our taste, I do realize that the color clashes in that photo are nothing short of horrific, and assure you that they are NOT intentional.)

An attic stair was the only solution to our ceiling access problems. Fortunately, finding a home for the sizable hole required for these was easy. In the sitting room at the top of the stairs was a unsightly set of metal louvers disguising an absolute beast of a whole-house fan in the attic.

louvers

This thing looks like it was pulled off the nose of a Beechcraft King Air 350i Turboprop.

attic fan

Unfortunately, we never used it because the knucklehead who wired it reversed polarities causing it to blow air down, holding the louvers in the ceiling closed, rather than sucking air out of the house as intended. For the record, whole-house fans aren’t well-suited for this climate. Our cool summer nights are typically accompanied by high humidity levels, so even though the fan might have lowered temperatures downstairs, it would have been sucking in sticky, uncomfortable air. Then as that air heated up throughout the day, you’d end up with a soupy, sweaty house. If you live in Flagstaff, Arizona or Portsmouth, Maine, though, a whole-house fan can be a lovely thing to have.

Our attic is actually fairly pleasant as far as attics go. It’s tall, has beautiful 2-1/2″ wide oak ceiling joists that make walking easy and old-school wood joinery that makes my heart go pitter-patter.  And this time of year it’s not Hades-hot.

Without belaboring the details, over the course of two days I managed to do the following:

  • disassemble and remove the whole-house fan (a huge thank you to my uncle Gregg for his assistance with this – his ingenuity seems limitless, and I would certainly have killed myself trying to do it alone)
  • slightly enlarge the existing hole for the attic stairs
  • install a wood header to frame the opening and support the stairs
  • install and adjust the stairs for a perfect fit

I haven’t had many opportunities to use my carpentry skills since moving to Hillsborough, so it was nice to see some sawdust flying again. There’s a fair amount of work left to be done to patch the portion of the hole not occupied by the stairs and to trim out the opening, but the stairs are functional which means that we’ll have a furnace up there this week or next.

finished stair

We paid a few extra bucks for a nice set of aluminum stairs with insulation and weatherstripping. The hope is that they’ll prove a bit more durable than standard wooden attic stairs and that they’ll help stem the tide of warm air that escapes through our ceilings each day.

The HVAC boys are in the house and we’re like a couple of kids on Christmas morning watching the install progress.  Until they’ve got us up and running for good, we’re much more comfortable thanks to our neighbor David, who kindly loaned us a large kerosene heater that puts our electric radiators to shame.

Hillsborough, on newsstands now

Since I have a blog, you may have surmised that I enjoy writing, and you’d be right. The gift of gab is one I never got. Instead, I prefer to deliberately shape my thoughts by setting pencil to paper or fingertips to a keyboard. Aside from the daily barrage of e-mail at work, I don’t find many opportunities to exercise my writing muscles. Before I began recording my thoughts here, I was searching for other ways to make the written word a part of my career.  Several years ago, I was fortunate to write about the kitchen renovation project in our previous house in the pages of Fine Homebuilding magazine. Writing the piece was so enjoyable, that I’ve since penned several more articles for that publication, including a recent guide to designing a classic fireplace mantel. My talented former colleague and friend, Jim Compton, did the illustrations.

Most architects would like clients think that their designs emerge fully-formed from the depths of their genius. But, truthfully, we all borrow liberally from the world around us, assembling familiar elements in new ways to meet the design challenges of a particular project. In the article about mantels, I didn’t have to look far for inspiration. Five feet from the couch where I did most of the writing is a beautiful fireplace and mantel, with an unfortunate color:

living room 1

Below is an illustration excerpted from the Fine Homebuilding article.  Notice any similarities?

FHB mantel

I’m not ashamed to admit that I took inspiration from my own home. Until recently, architecture had a long tradition of pattern books, which recorded the details of great buildings for anyone to emulate.  There’s no arguing that our mantel if a fine example of a traditional design, so why not enable others to replicate it elsewhere? Hillsborough has a remarkable built heritage and I’m proud to share this small slice of it with folks nationwide.

Amped up

Any novelty that accompanied the challenge of living through this winter without heat is long gone. I think it disappeared completely right around the third consecutive morning with temperatures in the teens early last week. Heating this house with electric radiators mid-winter is, to use an indelicate analogy, like pissin’ in the ocean: it just doesn’t make much of a difference. I’ve made peace with our modern-day frailty and look forward to the day when we can click the thermostat over to ‘heat’ and luxuriate in a living room with temps somewhere north of arctic.

Fortunately, that day is almost here. Our biggest obstacle to installation of the new HVAC systems was our undersized electrical service. The previous owners limped along with only 100 amps by using fuel-fired appliances: the boiler, water heater and dryer all run on natural gas. To complicate matters, the main electrical panel is almost full, limiting our ability to add new circuits in the future. And to top it off, our existing service entrance was outdated and recently blew itself apart, probably because the radiators were showing it more action that it had seen in years.

Last week our electrician got us upgraded to 200 amps, the de facto standard for electrical service in today’s energy-hungry homes. Before the switchover, the main electrical wire dropped from the street to the house, went down the masthead, punched into the crawlspace of the library and looped around to the meter box on the back side of the chimney. From there, a chunky metal conduit ran along the foundation across the back of the house to the main electric panel in the basement. This arrangement was roundabout, ugly, and lagged behind modern building codes.

old meter

In order to avoid the cost and disruption of completely rewiring the electrical panel in the basement, the electrician used a combination meter base and breaker box. This will give us the ability to pull new circuits directly from this box, rather than the maxed-out panel in the basement.. A chunky feeder cable runs from the meter/breaker box, through the crawlspace of the library, across the ceiling of the basement and into the existing panel. When Duke Energy moved their wires to the new service entrance, it took the electrician only about an hour to wire this cable into the old panel, restoring power to all our existing circuits.

new meter

I wouldn’t classify any electrical equipment as attractive, but our electrician did very neat work and his installation was tidy enough to elicit unsolicited praise from the county electrical inspector. Come spring, I’ll paint out the new box and masthead and remove the old meter base and conduit.

service entrance

Most of us could care less whether we’ve got 40 amps or 400 as long as the lights come on when a switch is flipped.  I’m happy to know that we’ve got a professionally-installed electrical service, but ecstatic to know that we’ve got what it takes to install central heat and air.  One week from today, a service van will pull into our driveway with the first furnace in tow, not a moment too soon.


Painted, guttered ‘n shuttered

If asked, I could sit down right this second and come up with a list of a thousand things that we need/want to do to our house. Any renovation project, particularly one done over time, becomes a question of priorities. Would we rather be sinking our hard-earned dough into the new kitchen? You betcha. But an ugly, failing paint job and gutters that were rusting through made it clear that our first projects needed to address these more urgent, if decidedly unsexy issues.  Fortunately, the roof is only a few years old, so that portion of the exterior envelope is sound. And come spring, we’ll need to cap and repoint the chimneys. But the siding and gutters were at a point that any further neglect would have compounded our exterior issues, resulting in more expensive problems down the line.

The happy side effect of all this work is that (at least from the outside) the house no longer looks like it’s succumbing to its age. Instead, it wears it proudly, imperfections and all. The colors make it look dignified, formal, like it’s put on a well-tailored suit. I’m not going to lie: being located across the street from the offices of the Alliance for Historic Hillsborough and the Vistor’s Center adds some pressure to get the place looking good. After all, our house is staring every visitor in the face as soon as they walk out the front door over there.

I’ll address the specifics of these projects in more detail in later posts. But for now, a couple of before and afters can do the talking:

front before

front after

I’m still not sure what to do about that camellia tree.  It’s beautiful in bloom, provides shade and privacy for the porch in summer, but blocks a full third of the front facade.  Suggestions, anybody?

side before

side after

If you’re wondering what contractors we used for these projects, I’ve started a new page on the blog called “Highl[e]y recommended” where I’ll list succinct and forthright reviews of everyone we hire that does a reasonably good job.  As an architect and advanced DIY-er, I can be a demanding and critical customer, so I can confidently say that a good review here is a strong endorsement for their services.

Pretty ordinary #005

Last weekend’s unseasonably warm weather seems to have confused many of the bulbs in our yard. Everywhere you look green shoots are poking out of the dirt, unsure of their next move now that a blast of arctic air has settled over North Carolina.  There is one species that seems undaunted by the cold: these tiny crocuses (croci?) managed to open their blooms completely, offering an unexpected display of winter-time color.

croci